Dawn of War: Strategic Point System

From RelicWiki
Contents |
Strategic Point System
The Strategic Point System is one of the key features of the Dawn of War game. The primary use of a Strategic Point is to gain resources, but they are also used to unlock special units, reveal infiltrated units, and under some conditions, win the game.
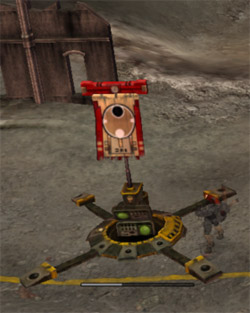
Strategic Points can only be owned by a single player at any point in time. Strategic Points are unowned at the start of the game. You can tell who owns a particular Strategic Point by looking at the flag displayed above it; if no flag is displayed, the point has no owner.
A point will generate a steady stream of requisition for its owner automatically. However, Strategic Points will slowly decay 15 minutes after their capture, producing less requisition until they are decaptured. Strategic Points also grant sight around themselves to their owner.
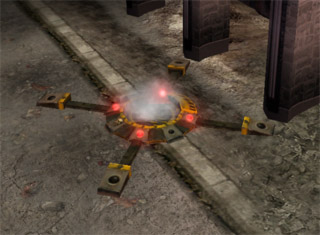
To capture a Strategic Point, select an infantry unit and right click on the point. The squad will stand next to it until the gray timer bar below the point fills up and your flag is raised. Not all infantry units are able to capture Strategic Points. During this time, the squad is unable to act in any way (the troops cannot move, fire, fight in close combat or use special abilities) and so is very vulnerable to attack. Once the bar has filled up completely, the point is yours.
To take a point from an enemy you must first decapture it, which is performed in the same manner as capturing. Doing this returns the point to an unowned state. Any structures placed on top of the point must be destroyed before it can be decaptured.
If a troop squad is issued another order at any point while performing a capture, the Strategic Point will slowly revert back to the state it was at beforehand, meaning that the capture can be resumed if needed (albeit with lost progress). You will be issued a warning message that states that the point capture has halted, and that the point will be lost if it completely reverts. If a decapture is interrupted, the point will immediately revert back to ownership of the original player.
Types of Strategic Point
There are three types of Strategic Points in the game:
Strategic Points
These are the basic point and the most numerous by far. These appear blue on the minimap. Once captured, these will increase your requisition rate by ![]() +6 , and capturing as many of these as quickly as possible is necessary for survival in the game. If you have the Control Area victory condition turned on then capturing over two thirds of these points and holding them for 8 minutes will give you victory. Strategic Points have a sight radius of 35 and a detection radius of 7.
+6 , and capturing as many of these as quickly as possible is necessary for survival in the game. If you have the Control Area victory condition turned on then capturing over two thirds of these points and holding them for 8 minutes will give you victory. Strategic Points have a sight radius of 35 and a detection radius of 7.
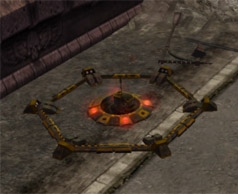
Relics
These are much less common than Strategic Points and will often be positioned much further away from the initial start point of your base. Relics appear yellow on the minimap. There is never more than one Relic per player spot on the map, and there can be less than one per player or even none on the map at all. All of the ultimate or 'uber' units of each race (such as the Baneblade or Avatar of Khaine) require possession of a Relic to be built so this means that they can often be hard fought over. Relics give you the same amount of base requisition bonus as the other two types of control points (![]() +6 ), but they give off a much smaller sight radius than normal Strategic Points at only 15, although they still have a detection radius of 7. Relics take longer to capture than normal Strategic Points.
+6 ), but they give off a much smaller sight radius than normal Strategic Points at only 15, although they still have a detection radius of 7. Relics take longer to capture than normal Strategic Points.
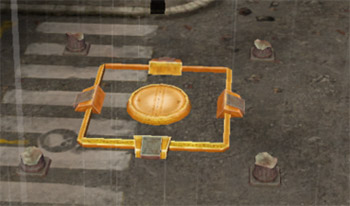
Critical Locations
These points are generally located in the middle ground or area that are designed to be fought over. The number of critical locations on the map tends to vary from 1 to 5, and if you are playing with Take and Hold victory on then capturing and holding over 50% of the Critical Locations for 7 minutes will gain you victory. Critical Locations show up orange on the minimap and are different from strategic points and relics because they cannot be built upon, but still provide the same ![]() +6 income as them. Critical Locations also give a larger sight radius than normal Strategic Points at 50 and a detection radius of 8. Critical Locations also take longer to capture and decapture than normal Strategic Points. For Necrons, Critical Locations give a 10% reduction to unit build times, reinforcement times, and research times like an Obelisk. (a 15% reduction in Dark Crusade).
+6 income as them. Critical Locations also give a larger sight radius than normal Strategic Points at 50 and a detection radius of 8. Critical Locations also take longer to capture and decapture than normal Strategic Points. For Necrons, Critical Locations give a 10% reduction to unit build times, reinforcement times, and research times like an Obelisk. (a 15% reduction in Dark Crusade).
Listening Posts
Once you have captured a Strategic Point or Relic you may build a listening post on it. This will double its requisition production, and will also help prevent it from being decaptured due to the fact that the post must be destroyed before the point can be taken.
This listening post may then be upgraded two times, each upgrade further fortifying the position and providing more advanced defensive guns to protect your point. These upgrades will make the point even more secure, although end game units will not have much trouble disposing of these fortifications. The upgrades also increase the points Requisition production by +6 each. Necrons do not gain any resource bonuses from upgrading their Obelisks, just improved defense.
Capture Rates
The times required to capture a point are as follows:
- Strategic Point: 20 seconds
- Relic: 45 seconds
- Critical Location: 45 seconds
Decapture Rate
The decapture rate for any unit is 33% of the original capture time.
Decay
After a point has been held for 15 minutes, the amount of requisition it produces begins to decay. This feature reduces the effectiveness of "turtle" strategies, and is intended to keep points contested, as a de-captured point will return to full production. The point continues to decay until it is only producing 45% of its full capacity, which happens after holding a point for 18 minutes, 20 seconds. Building Listening Posts does not affect the timer, and therefore a newly built Listening Post on a decayed point will never generate at its full potential.
Capture Rate Modifiers
Each race has a modifier which reduces or increases the rate at which a point is captured. Some races even have units which have modifiers different from the standard race modifier. To find the modified capture rate, divide the normal rate by the race or unit modifier. For example, a Guardsmen Squad captures a Strategic Point in 20s/0.85=23.5s.
Space Marines
- Race Modifier: 0.63
Imperial Guard
- Race Modifier: 0.85
- Sentinel Modifier: 1.5 (only for decapturing)
Eldar
- Race Modifier: 0.63
Chaos
- Race Modifier: 0.63
Orks
- Race Modifier: 0.9
- Flash Gitz Modifier: 1.0
Necrons
- Race Modifier: 0.55 (0.5 in Dark Crusade)
- Wraith Modifier: 1.0 (only for decapturing)
Tau
- Race Modifier: 0.63
Dark Eldar
- Race Modifier: 0.85
- Reaver Jetbike Modifier: 2.5 (only for decapturing)
Sisters of Battle
- Race Modifier: 0.63
The Dawn of War Player's Guide
| The Dawn of War Player's Guide - Thought of the day: Knowledge is power, guard it well. | ||||||||
|---|---|---|---|---|---|---|---|---|
| Space Marines | Chaos | Eldar | Orks | Imperial Guard | Tau | Necrons | Dark Eldar | Sisters of Battle |
|
Infantry |
Infantry |
Infantry |
Infantry |
Infantry |
Infantry |
Infantry |
Infantry |
Infantry |
| Space Marines | Chaos | Eldar | Orks | Imperial Guard | Tau | Necrons | Dark Eldar | Sisters of Battle |
|
Vehicles |
Vehicles |
Vehicles |
Vehicles |
Vehicles |
Vehicles |
Vehicles |
Vehicles |
Vehicles |
| Space Marines | Chaos | Eldar | Orks | Imperial Guard | Tau | Necrons | Dark Eldar | Sisters of Battle |
|
Buildings |
Buildings |
Buildings |
Buildings |
Buildings |
Buildings |
Buildings |
Buildings |
Buildings |